Archive for the ‘Greenhouses’ Category

Random4

Oregon Green Pine/Pinus nigra “Oregon Green” – now

I just came in from my usual morning stroll thru the garden.  It was a bit damp with a slight drizzle.  I particularly like to walk in the garden when it’s all wet.  The plants feel incredibly alive!  The rainfall is so nourishing.  It seems like all the plants are rejoicing.  Walking in the garden got me all excited about it so I thought it was a good time to do my next post of miscellaneous photos.  Most are very recent but a few are from Fall or Winter.  I’ll tell you.

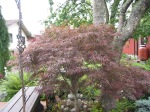
I already showed you a photo of this pine from the front so you could see the candles on the outside.  This is the inside.  I pruned it out in February.  My main goal was to open up the center for both sight and air circulation.  I also just felt it was a little crowded inside.  It felt like the energy wasn’t moving thru it properly.   I tried to bring out the inner “flow” to it.   It all radiates out from the main trunk now.  The tree has done most of this itself.   I pruned out the inner part but the tree itself created the sinuous form.  You can’t see it in the photo but it continues to twist and turn as it reaches the top.

3 Fabulous Ferns – now

This is the west end of the fern bed that runs along the north side of the garage.  The 3 ferns here are, from left to right, a Hard Shied Fern (Polystichum aculeatum), and Mackino’s Holly Fern (Polystichum mackinoi” and a Remote Wood Fern (Dryopteris remota).  Underneath them all is a wonderful patch of Baby Tears (Soleirolia soleirolii).  I’ve loved this little plant since we had it growing at my parent’s home in the first landscape I ever did for them.  It brings back good memories.


Tomato Seedlings In the Greenhouse – April

I started 9 seeds each of 3 different heirloom varieties.  2 I bought form the Seed Saver’s Exchange, a seed bank/seller I recommend highly.  The other one I planted with seeds I grew last year.  Beam’s Yellow Pears.  Small sweet pear shape yellow fruits kids eat like candy, and so do adults… These were so well developed we could plant them in early May.  They’re good sized now.  I had way too many of course – I only planted 2 of each variety for us.  So I put the others out on the front parking strip and people took them almost immediately.  I love sharing the plants I grow.

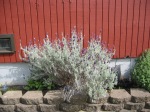
Silver Knight Scotch Heather/Calluna vulgaris “Silver Knight” – now

This lovely little heather is at the foot of our front steps.  In late summer it’s covered with light lavender blooms, but I planted it more for the foliage and form than the flower, since that’s what we see most of the year.  We planted it about 5 years ago.

Tenzan Sugi/Cryptomeria japonica “Tenzan” – now

This is the one plant in the garden that I can say with surety is a truly rare plant.  The nursery where I bought it labeled it as such and my reading confirms this to be true.  It’s the smallest form of Cryptomeria there is and valued as such.  Brand new here.  It only grows about 1/4″ a year.  It’s supposed to get about a foot big.  It’s only 8″ now.  It’ll take it years to do that.

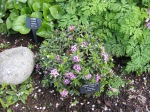
Charity Mahonia/Mahonia media “Charity” – now

This one has been here about 9 years.  In that time it’s grown to 12′ x 10′, give or take.  It’s a prickly thing so I had to prune it back quite a bit from the path at its foot.  I pruned up the branches but this year it’s putting back all the foliage I cut off!   Only it’s further back from the front so I won’t have to mess with it, and it won’t mess with us.  I did a post awhile back called Hummer Heaven that shows this in full bloom, covered with brilliant yellow flowers that the bees and hummers love.  On the left below it is a Soft Shield Fern (Polystichum setiferum), also known as Alaska Fern, tho it’s native to Europe.  Go figure.

Graciosa Hinoki False Cypress/Chamaecyparis obtusa “Graciosa” – now

I took this photo from the porch above this plant so you could see the delicate tracery on its branches.  We planted this tree just last year after the snow destroyed the big Arborvitae we had here.  It grows slowly at less than a foot a year.  It’ll get 10′ tall and 8′ wide.  It fits nicely among the rhododendrons, azaleas and kinnickinnick, under the Japanese maple at the right.

Waterfall Dissected Japanese Maple/Acer palmatum dissectum “Waterfall” – now

It does look a bit like a waterfall doesn’t it. The way the leaves overlap one another resembles water flowing down over it.  This tree has been growing here since 2013.  It’s grown from 2′ across to over 8′.  It’s supposed to get even bigger, so I have to prune it back from the lawn every spring.  It puts on 2′ of growth a year so it’s a bit of a job.  It gets harder every year.

Firefly Scotch Heather/Calluna vulgaris “Firefly” – Fall

This is one of the most colorful heathers there is.  In summer it’s orangish green, but the real show is in fall and winter when it turns this deep brick red.  We planted a line of them along the North side of our veggie garden.  It was too weird to watch the South side of the plants turn this great red color, but from the North side, where we stand to look at them, you can’t even tell the South side is red.  Shows you how important it is for plants to get sun, and at the right time, to turn color in fall.

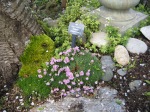
Lady Fern/Athyrium filix-femina – now

This lovely fern is a native of the Pacific Northwest.  We never plant them but they come up all over the garden, often in perfect places like this one.  It’s a deciduous fern so it dies back to the ground in fall.  This one is over 5′ tall and got that way because it was growing behind a large Arborvitae that supported it.  Now it tends to flop on the rhodies in front of it.

Bloodgood Japanese Maple/Acer palmatum atropurpureum “Bloodgood” – now

This maple is in the middle of the garden.  When you look at it all from the back deck it really stands out.  It’s been here for 8 years, and is now 14 1/2′ x 11′.  It will eventually get large enough to fill the space it inhabits now. I’ll have to do some pruning as the years go by to encourage the trees to all fit together, as I do so often.  In fall this tree gets much darker red, almost black and burgundy and is truly stunning.  It’s big enough now to feel like it’s a real tree when you’re underneath it.

Primo Eastern Arborvitae/Thuja occidentalis “Isl/Prm Primo” – now

We just got this cute little thing this last winter.  When we bought it it was a darkish brown color.  Now it’s this lovely dark green.  I love how the branches grow upward like some stone formations I’ve seen in the terrain of the inner mountain west. But this is actually from the east coast and has the same parent as the ubiquitous Pyrimidal Arborviate, the columnar tree grown so frequently as a tall fast growing hedge.  By contrast “Primo” only grows an inch a year, if that.

OK, that’s another batch.  I may only have one more set, but I have to count them to see.  I may add a few more too, if I see some more I like.  I keep taking photos so you never know.  I’m really enjoying this casual flowing show of photos.  It’s so much easier to just post them and write a bit about them.  I don’t have to have an overarching theme to follow.  But I imagine I’ll get back to that format now that I’m feeling somewhat caught up.

This blog is partly a chronicle of the timeline of the plants in this garden, so I have to keep posting their pictures as they grow up.  I’ve taken over 9,000 photos of this garden so I never lack for subjects to post.  It’s so interesting to me to show them as they’ve grown.  It’s very educational, and lots of fun.  I’ve learned a lot growing this garden.  Skills I use in my daily life – Patience being the biggest one I suppose.  You absolutely have to be patient to be a gardener (and I have to work at it).  Plants grow on their own schedules, not ours.  The same is true of life.

Acceptance that it is what it is, is the key.

Steve

Then and Now

Photo taken 11/08

I thought it might be fun to do a retrospective of the whole garden from its beginning 10 or 11 years ago to today.  This is what the front of the property along the street looked like when I first met Louie in February 2008.

Photo taken 1/20

Same scene today.

Photo taken 11/09

I didn’t have an earlier photo so this one was taken when the plants were first planted.

Photo taken 1/20

Fewer plants of some types, more of others.

Photo taken 11/08

This is the entrance to the house.  Look how small the plants are.

Photo taken 1/20

The Himalayan Sweet Box in the center scents the whole area now.  It’s grown a lot.

Photo taken 11/08

Future site of many cool herbs.  It’s so empty!

Photo taken 1/20

Now this is an herb bed!  Look at the Tuscan Blue Rosemary at the very back!

Photo taken 11/08

We had to take out this poor apple.  It was in bad health and the apples were awful.

Photo taken 1/20

Much more open now.  It’s nice to see thru it all.

Photo taken 11/08

This had grass up to the garage when we started digging.  Such rich soil!

Photo taken 1/20

Many many ferns later…  and a greenhouse at the end!

Photo taken 11/09

I didn’t have one from when this was empty, but there was grass to the fence before we dug it out.

Photo taken 1/20

This is a bit wider shot so you can see we put in a bamboo fence and many plants.

Photo taken 11/08

This is the west end of the garage before we built the greenhouse onto it.

Photo taken 1/20

Looking over the veggie garden to the greenhouse.

Photo taken 12/07

This was taken about 2 months before Louie and I met.

Photo taken 1/20

It’s a real Garden now!!  Here’s to our little Wildlife and Nature Sanctuary!

I hope you enjoyed looking at these photos as much as I enjoyed putting them all together.  I had to do a lot of searching through my photo files.  I have some 8,000 photos of the garden since 2007 so there were a lot to choose from.  I tried to take the “now” photos from about the same place the originals were taken but I didn’t always accomplish that.  I think they still get the point across.

It’s amazing to me to look at these and see just how much things have changed.  It’s possible to transform an entire yard into a beautiful garden so thoroughly.  It’s why I loved creating gardens for people in my past.  You can make such a difference with a few (OK maybe a Lot!) of plants and some time.  It’s very rewarding.  I love gardening!

Time travel has its rewards!

Steve

A Spring Garden Walk

Welcome to the front entrance to our home.  The tree in the center is a cultivar of the Port Orford Cedar, or Lawson Cypress, called “Wissel’s Saguaro”, due to its branches sticking out like the arms of a Saguaro cactus.  An interesting creature to greet our visitors.  The shrub with the red berries behind it is a large Nandina domestica “Moyer’s Red”.

Entering the front garden.   There used to be a large Arborvitae shrub where all the small plants on the left are now.  It was some 8′ across and 7′ tall.  That was until the snow hit in February and crushed the life out of the center of it.  We had to remove the whole plant (tons of work!) and replace it with a new collection of wonderful plants.  We lost our privacy but gained a new view of the garden entrance.  It feels very welcoming now as you enter under the arch formed by the Japanese maple on the left and the Oregon Green Pine on the right.  The wonky looking sign in front is from the Washington State Dept. of Fish and Wildlife, designating us as a Backyard Wildlife Sanctuary.  We welcome many wild creatures here.

Taking the next steps into the garden.  On the left you can just see a very fragrant Winter Daphne, and on the right is a gorgeous PJM Regal Rhododendron in full bloom.  The bench is a fine place to sit and read or just view the garden.

A better view of the Daphne, with a species Hinoki Cypress over it.   The tree will get large in time and provide a nice sheltered corner for the front porch.  At the right is a large Sappho Rhododendron waiting to bloom.  The hanging items are a hummingbird feeder, a wasp trap and our rainbow wind sock.  More food for the birds and safety and beauty for us.

Sitting on the bench and looking back at the entrance to the garden.  The large deciduous tree on the right is a Sango Kaku Japanese maple and the conifer on the left is the Oregon Green Pine.  You can see a bit of the arch they create together.  The large shrub in front of the bench is a Mr. Bowling Ball arborvitae.  It has very interesting foliage and cool winter color.

The stone path leading to the back garden.  On the left is a small Weeping White Spruce we put in to replace the large Blue Spruce we removed last fall because it was going to get too big.  A sad loss but it’ll save us heartache in years to come.  The hedge on the right is deciduous and just greening up.  It’s been here for over 40 years and it’s still going strong!

Entering the back garden from the path by the house.  The walk is covered with several inches of bark to keep it clean and attractive.  Nothing will grow there because it’s too shady.  Oh the left you can just see the light lavender flowers of the Rhododendron cilpenense and a bit of a red Unryu camellia.  The small Magnolia on the right suffered greatly in the snow and will never be the same.  But I staked it up a lot and it will recover at least somewhat.  Much patience will be required!

A view of the center of the back garden.  You can’t see the trees too well because they’re still dormant.  They’ll look much more lush in a few weeks.  Sorry it’s so dark here – it was an overcast day, as is common in April here in Seattle.

The center from a side view. The large shrub on the left is a dwarf Coast Redwood called “Kelley’s Prostrate” that only grows to 2 feet tall and about 7 feet wide, so far.  The species gets a huge 360 feet tall.  It’s so nice to have the redwood foliage here in our small garden that could never accommodate the larger species tree.  The fountain gives us hours of pleasure listening to its gentle sounds, much like a small creek or stream.  Imagination does wonders when your eyes are closed!

Looking into the side of the garden a bit further down from the last shot.  The small pink flowers on the right belong to a “Howard McMinn” Manzanita, and the bright pink one on the lower left is a “Kramer’s Rote” heath.  Above the heath is a small Lily of the Valley shrub and at the back is a large “Pink Icicle” camellia just coming into bloom.

You’ll see this as you walk the path I showed in the last photo.  The tree in the back is a “Wintergreen” Japanese Umbrella Pine, which also took a hit in the snow.  All these branches used to stand straight up.  Now they’re all wonky.  I doubt they’ll pull themselves back up, but ya never know.  I’ll give it time before I do any corrective pruning.  On the right you can just see the trunk of a contorted Japanese Larch called Diana.  The branches twist and turn most interestingly.  It’s been leafing out for a month now with its small bright apple-green needles.  I’ll do a post on it someday.

This is taken from the same spot as the last one only turned a bit to the right.  You can see the camellia and the cool lantern we had made for us out of wrought iron.  It helps light up the small deck you can see below it.  In the back is a large Radicans cryptomeria which will dominate the area in years to come.

A few more steps bring us to this shot of the deck, with the lawn and the house in the background.  This little deck is a sweet place to hang out and read or just listen to the sounds of the fountain next to it (you can’t see it here).  The upper deck by the house is a great place to spend some time sunbathing in private, and is a good place to have company over for cookouts.

Full circle – this is a shot of the walkway we entered the back garden through.  The bare tree on the left is an “Eddie’s White Wonder” dogwood just about to burst into bloom.  It got Anthracnose last year so we’re spraying it with Neem oil every week or so to try to eradicate it.  It won’t kill the tree but it looks terrible as the summer progresses.  I hope we can kill it off!

Here we circle back to the inner yard to see the veggie gardens and the greenhouse on your left.  The water barrel gives us enough to water the greenhouse most of the year, except in summer when it doesn’t rain. (Yes, we have Very dry summers here!)

A closer view of the greenhouse.  You can see the seed starting bed on the left with its plastic cover that holds in the moisture and heat to help the seeds germinate.  I put the curtain over the lower part of the door so I can go out and work in the greenhouse naked without spooking the neighbors.  I do it outdoors too when they’re all gone.  More on that later on!

Here’s one of the veggie gardens.  We planted the trees and heathers along the north end to tie the beds to the other parts of the garden.  We lost some planting space but still have plenty of room for many crops.  The bees love the heather flowers and they help pollinate the garden.  We grew enough onions and carrots last year that we’re still eating them today.  It’s so yummy to grow your own food.  We even have some Kale that overwintered in the back by the fence.  Sweet and tasty!

This is the last shot.  It shows how the veggie gardens and the ornamental ones merge with the path through the lawn between them.  We have gates on all sides of the garden to be able to visit the neighbors.  So far we’ve had good ones, though we’re waiting to see who buys the house next door.  They all help make this a great neighborhood to live in!

So that’s the tour.  Sorry it was an overcast day, but I hope the photos came out well enough for you to see what I was hoping to show you.  It’s an exciting time in the garden now with so many plants bursting with their new spring blossoms and others just breaking dormancy and starting to leaf out.  It’ll all look so different in a few weeks as the trees put on their new summer leaves and the other plants continue to bloom.  It’s such a joy to be in a garden in the Spring!

May your own gardens grow bountifully!

Steve

Building a Walkway

We’ve been slogging thru the wet grass and mud for years now to get from the house and garage to the greenhouse.  So we decided it was time to build a new path to it so we don’t get so wet and yucky.  It was a big project but Louie and I work well together and it only took a few hours, over several days that is.  It was actually kind of fun, once we got everything straightened out so the lines were clear from the old walk to the new one.  Lining it up was crucial to making it look good and a part of the whole.  It worked out just as we’d hoped.  Here it is in various stages of construction:

These are the materials we used.  We had 34 exposed aggregate stones that each weigh about 40 pounds, so just with the stones we moved some 1400 pounds. But before we put down the stones we had to spread 20 sacks of gravel at 100 pounds a sack, or a ton of gravel.   Then we put down 10 100 pound sacks of sand for another 1/2 ton.  So all together we moved close to 2 1/2 tons of material to construct this thing.  And that doesn’t count all the soil we moved!  No wonder it was tiring!

Here it is in an early stage of work when we have the grass out and the gravel just begun.  You can see the old walkway we started from that is the same style of bricks.  We wanted a consistent look to it so we used the  same materials.  We put down about 3-4″ of gravel and 2″ of sand to make the bed for the stones.

We ran all the dirt thru a screen we’d devised earlier just for that purpose.  It sifts out the stones and the grass.  We  compost the grass and toss the stones under the deck.  But the soil we used in the garden to increase the level with a few inches of new soil.  In order to fit it all in there we raised the sides of the beds of the garden about 6″ to allow for the new soil.  We’ll have to mix in compost to make the garden rich again and will do so once the current crop of kale and mustard greens, and the last of the tomatoes, are gone.

Here you can see the gravel starting to be spread on the path.  You can see one of the stones set here to get a feel for the level.  Once the gravel is at the right depth we added the sand to bring the depth up and to even it all so that it can be exactly the same level as the current walkway.  We did OK at that so the line is straight and the path is on an even grade and has no bumps or low spaces in it.  Next we put down the stones to finish it off.

Here is the actual walk set in place.  We threw a bunch of sand down over it to fill in the cracks and make it all solid.   We had to cut some of the stones to fit with the step of the greenhouse.  We had a diamond masonry blade to use to cut the stone.  It did a great job as long as we wore masks to keep the stone dust out of our noses and dripped some water on the blade to keep the dust down and the blade cool.   We just used our circular saw we already had and have used for many previous projects.

Here I am sweeping the sand over the walk to get it into all the cracks.  It took awhile and then we let it settle for a day or so before watering it in and getting it all smooth and nice.  The sand makes it all look like a solid path.  You can see we did a pretty good job of cutting the lawn back to the edge of the stones so that the grass will grow back even and make it all feel like it’s been there for awhile, which it does today as I write this.

Here it is all finished and ready to use.  You can see it’s much lighter than the old one, but then the ‘old’ one was put in new just a few years ago to match what we had then.  It’s weathering well and looking as good as the original old stone we reused in that first project.  The new stone will weather just as well and look consistent in time.  This is being so useful to us already as we go back and forth to the garage and the greenhouse.  We can stay dry now and have a clean path to walk on so we don’t track mud into the house.

This was a relatively big project but we got it done despite the hard work.  It’s not that difficult to do if you want a walk like this.  It was work of course and you have to have a good eye for the lines so it comes out straight and level.  But that difficulty is OK when you consider that you’ve made it yourself and can be proud of your work.  It’s worth it to have done it ourselves.  We’re glad we put it in despite all the work, and you will be too if you decide to try this.

Happy building!

Steve

Night Scented Tobacco

IMG_5899

I’m ashamed to say I don’t have the correct botanical name for this plant. I planted it in my greenhouse as a seed two years ago and grew it over the winter for two years to get it to where I could plant it out this spring. I had about 1/2 a dozen of them but this is the only one that got to blooming size. It’s a beauty and has really fragrant flowers, even in daytime let alone at night when it really shines. It’s just lovely.


IMG_5898

Here it is  in the bed of mostly wild flowers I re-seed every year with some seeds I save and some I get new. You can see the old heads of Phacelia or Bee’s Friend in here, and some Clarkia and of course the old Hollyhock that has been there for 3 or 4 years now. And the poppies of course. I have yet to make poppy seed cookies with the seeds but I’m saving them and replant them every year to great joy. They’re so beautiful.


IMG_5900

And finally here’s a shot I took by sticking my camera up under the plant so I could see the underside of the flowers. They’re stars! You get a good sense of how they look from this vantage point. I’m hoping I can save some seeds of this one for next year, or maybe two years if it follows the way it’s grown and takes me two years to get a blooming plant. It’s all worth it and maybe next year my greenhouse heating cable will work right and I won’t lose all my seedlings like I did this year. Ah well, the vagaries of gardening, eh?

Smelling the flowers,

Steve

Shades of Red


And Pink, and Purple, and some in between colors too, but they all fit in the spectrum of Red. I’m amazed by all the plants I have that have red tones to them. It’s obviously a pretty popular color. I’ve tried to add them to the garden because they add so much interest and I love the varied hues they represent. Some of them are in the leaf and others are in the blooms, but all are in the reddish range and provide some intense color to the garden at most any time of the year. These pictures cover the last few months since things started to bloom and leaf out well, tho they’re not in any particular chronological order.

First up is a Yarrow that just keeps getting better each year. It’s called Paprika and has intense red blooms with yellow flecks in the centers. Then are 3 different red Japanese maples that are even named red, like the Red Dragon and Red Pygmy, and the Bloodgood is considered the most excellent red cultivar of Japanese maples you can find. It’s been in circulation since the 1800’s sometime as I recall.

The weeping beech I planted as a memorial for my brother and it has his ashes underneath it. It’ll get taller eventually but since I stopped staking it up it’s stopped getting taller for now. I’m hoping it’ll mound up on itself as time goes on but it may just get wider I’m not sure. The Red Fox Katsura is hard to see I know but it has deep purple blue green leaves that are even more red at first growth. It hasn’t grown this year at all which concerns me but patience is called for here and I’m trying my best to just allow it to grow on its own pace. It’ll be a lovely tree in time.

The Physocarpus, or Ninebark as they’re called, is a small shrub with deep maroon leaves and light pink flowers that didn’t bloom much this year but it grew well. While the Blue Peter Rhodie has been here for years and always puts on a fine display of flowers. The lavender and the sage are in the Herb bed and I’ve gotten a lot of good food from this bed. I harvested my savory and oregano awhile ago while it was in fresh growth and some rosemary too. I’ll have a good stash for cooking this year.

The Mountain Fire Pieris, or Lily of the Valley shrub, has such fine red tones when it first leafs out that turn to a light mahogany and then to  green as time goes on. Buds will set on it from this fall and it’ll bloom in winter with white blooms. I’m rooting for this one to get bigger so it screens us from the neighbors on the deck. It takes time tho so I have to be patient again. It’s required when you a start a garden mostly from scratch and use smaller plants like we did. It takes time and waiting is hard for me but I do it because what else can one do?

I know the Columbine I showed is more blue than red but it’s so beautiful I had to show it. It’s a self sown seedling that just came up in a bed of them I let happen. I love them so much I just let them grow since they aren’t in the way at all. The Heuchera is in the front yard and adds some nice color to that area there with its delicate blossoms and fine maroon leaves. The Anna Rose Whitney Rhodie is in the back of the whole garden and will be a foundation of the corner of the yard as it gets bigger which is doing well now.

The Barberry is a small shrub that has to compete with the Spruce next to it on one side and the Giant Sequoia on the other. It seems  to be holding its own tho so I’m not worried. A little bit of pruning on the spruce and it looks fine. The next azalea is one Louie planted years ago so I don’t know its name but it’s sure lovely isn’t it? Bright and lush it always makes me smile. So does the Ward’s Ruby, one of my favorite azaleas. It’s a kurume so it doesn’t get too big but has loads of blooms when it does so. The Bow Bells and Ken Janeck Rhodies both come on light pink and then one changes to deep pink and the other to white as they age. Both are lovely. The Ken Janeck is a Yak rhodie, a small form with huge leaves that I love. Very cool.

Clearly the Tulips have been here for awhile and it’s amazing that they still come up thru the soil we put there and the plants grow thru them now. They add some bright color to the winter garden when they bloom. The Elephant Ears or Saxifrage, are in the front of the whole garden and provide a soft haven of their flowers with their lush foliage. I love the deep color they have.

The Thrift, the Daphne and the Bleeding Heart are all in the same area and are quite wonderful when they all bloom together. The Daphne is so fragrant too, it’s possible to smell it standing up next to it but if you really want to smell it you have to get down on your knees. It’s wonderful. The Blue Diamond Rhodie has grown a lot this year but only bloomed a bit. It’s so healthy tho I’m happy with it. The currant is blooming well in this picture but hasn’t grown much yet this year, as have so many plants. It seems to be the year of patience for me this year as I’ve said before. Ah well, as long as they keep growing I have faith that they’ll do well in time.

The Racemosum Rhodie is a species Rhodie that has wonderful light pink blooms at an early stage in the season. They come when you’re just tired of winter and need a bit of color in the garden. They provide some wonderful  blooms. The Winter Daphne has wonderfully fragrant flowers in pink and the Ural False Spirea has such cool pinkish tips to its growth I’ve included both which live next to each other in the front yard. You can smell the daphne all over he yard when it blooms.

The Goshiki Kotohime maple means “variegated old harp” in Japanese. It supposedly reminds one of the Koto, a stringed instrument that is endemic to Japan. A lovely plant and a wonderful instrument. This is the new growth that is so very bright and then fades to green as the year progresses. Very lovely. The Heath  is in the Heather garden and adds some blossoms in winter when the heathers are dormant.

The next shot it is of under the starting bed in the greenhouse and has a Persian cyclamen and a Tradescantia which both are doing well this year. They get a bit of water from the bed but we still give them extra to keep them going well. Last is a Moyers Red Nandina in full color with both leaves and berries red as can be. It’s a nice one to finish off this tour of red shades I think.

I hope you enjoyed this tour of Red. I’ve done blue before but never red and it seemed like it was time to do so. With all the maples in particular and the other plants now in such fine colors I just had to share them. They brighten up the garden like nothing else and are so varied as you can see that they provide much interest even beside the color. The forms and the textures too add dimensions to the whole interplay of color and style in this garden as they do in so many others.

Red Rules!

Steve

Subtle Signs of Spring

If any of you had any doubts about the fact that I’m a bit obsessive about this garden this post will certainly prove it. I have a small garden so I look very closely at it all the time. I’m always checking things out to see if there are new things happening in the garden, and usually there are. Especially now as we begin to turn into Spring.

I follow what’s often called a Celtic Calendar, which may or may not be true in fact, but it works well for me. I start spring at the beginning of February, as it seems to be the time when I see things beginning to sprout and bud out and begin to grow. I figure the Equinox is actually mid-spring as we’re well into it by then and things are in full swing. So then May 1st is the start of summer.

Summer solstice is Mid-summer to me and august 1st begins the Autumn time. It goes thru the Equinox as its center point and then winter begins at Halloween and has its mid point at the winter solstice. In each case we go into the season and come out of it it again in the space of the time allotted. It makes a lot of sense to me and seems to work well where I live tho it may not fit other climates at all.

So here are some shots of what Spring looks like at this time of year for me in this garden of small delights. And I do mean small. Some of these pictures are so hard to see that even with the slide show it’ll be difficult to see why I’m so excited. But if you look closely you’ll see what I’m seeing and why I’m so amazed about it all.

Starting off is an easy one – a Camellia japonica which is huge and loaded with buds. There are quite a few just starting to open and they look fine. This plant is in the tea family – the Theaceae and is related to commercial tea shrubs, which are called Camellia sinensis. I have a few of them in the greenhouse I’ll show to you someday.

Next is a subtle one – a red flowering currant, a Ribes sanguineum “King Edward VII”, in the Grossulariaceae family. It’s native to our area and gets about 6-8 feet or more with early pink blooms that will come on soon it looks like. Now you can just see the buds beginning to push out as the sap rises. And don’t ever think I have a perfect garden without weeds. Just look at the ones behind this plant! I’ve hated Bermuda grass since I was a kid and pulled it out all the time. Sigh…

The Candytuft, or Iberis, is in the Brassicaceae, with the mustard family crops we grow in the veggie garden like broccoli and cabbage. It’s already starting its early bloom season out by the mailbox in front of the house. It turns pure white when it’s in full bloom.

Next is one that’s actually been blooming for awhile but I wanted show it since it’s so nice now. It’s a Mahonia Charity in the Berberidaceae family, the barberry family along with the next plant, the Oregon Grape. You can just see the small buds at its tips on this plant if you look closely. It’ll have the same yellow flowers with dark blue berries the birds love. The bees like the flowers too.

Next is a simple primrose in the Primulaceae that decided to begin blooming this early for a change. It’s an anomaly as they usually don’t do it this early but I guess it is so I’m happy with it… The next two are cheaters because they’re in the greenhouse. This first is a Persian cyclamen, also in the Primrose family, that has such lovely blooms now. The other is a beautifully scented plant called a Freesia that grows in the garden usually but it looked bad so it’s receiving attention in the greenhouse now. It’s doing well as you can see.

Following is the classic Winter Daphne, with all its frost burned leaves from the 14 degree weather we had a few weeks ago. It’s covered with new buds along the stem and even has a few bloom buds turning pink at their edges if you look inside it. It’s the sweetest thing in the garden when it blooms and it’s truly intoxicating. It’s in the Thymelaceae family.

I couldn’t go without touching the veggie garden a bit. Here is Swiss chard that is coming out now so early and has kept its color all thru the winter so far. It’ll be beginning  to grow soon and we’ll have some fresh greens to eat then. The next one is a weird vine called a California Dutchman’s Pipe and has these amazing purple flowers that really look like a pipe and can draw insects in to sip the nectar and pollinate them, but then they are set free and the plant doesn’t eat them as some plants do. It’s in the Aristolochiaceae along with the Wild Ginger I have in the garden. Both have really interesting flowers and I wonder if the whole family is like this. Cool…

This one you really have to look closely at. It’s a bed of naturalized Columbine seedlings that are growing nicely and will form quite a good patch of them in a bit. I love them even if they are a nuisance at times. They’re in the Ranunculaceae family, with all the other Ranunculus. Next is another teeny tiny one – a small Lupin that I think must be a Russel’s hybrid since it’s coming back where I put some last year. It’s a biennial in the Fabaceae, the Legume family, with peas and beans and all sorts of stuff we need to fix nitrogen in the soil. It’s got beautiful stocks of blue flowers in summertime.

Here’s the Hellebore, or Lenten Rose, that so many folks are seeing now in their gardens. This one started out as a Mardi Grass pink and put out some seedlings that are pure white so I get both colors when they bloom. They’re just starting and I cut them back this year to allow for lots of new growth. They’re in the Ranunculaceae along with the Columbines.

This one is an evergreen Clematis called Clematis armandi which will have sweet smelling white blossoms in a few weeks. It’s growing along the fence line and will get too big where it is but it’s so established I’m just going to have to live with it. I hope it does OK and thrives in this watery spot… It’s also in the Ranunculacea.

Now we come to a few Ericaceous plants. How could I not include them? First is a heath called Kramer’s Rote that is in almost full bloom now. It’s so nice in the heather garden as it gives us blooms in this time of year whereas the heathers proper bloom in summer. Next is a Lily of the Valley shrub, Mountain Flame, with some buds just starting to open. It blooms very early and is beautiful with its dark wine red buds.

The next is a simple Huckleberry, a native of the mountains of the PNW. You can just see the buds as they’re forming here and are ready to push forth sweet pink blossoms that will turn into tart blue black berries in a few months to feed the birds. We even get to taste a few of them… The last ericaceous one is a Leucothoe that is just starting to set its bloom buds as you can see at the ends of the branches. They’ll be white and smell a bit sweet.

Coming to the end we have a Ural False Spirea or Sorbaria sorbifolia “Sem”, which is in the Rosaceae or Rose family. You know it I’m sure… And the last one is another sweet one. It’s a Sarcococca ruscifolia or Himalayan Sweet box as I learned it. It fills the whole of the front entry to the house with its amazing fragrance now and is just lovely. It’s in the Buxaceae, or box family. I treasure this plant and even have two of them, a rare thing for me to do…

So that’s the tour of early Spring. I know these things I’ve shown are very subtle at times but that’s part of their charm to me. I love to see things like this when they are just beginning to grow and see them in their infancy. It’s so exciting to see things starting to grow again in this garden and I hope that things are going to start soon for you too, tho I know it’s not true for many of you covered in snow as you are.

I  sympathize. We’re due some snow in a day or two ourselves but it won’t be much. It’ll still get cold and we’ll still have snow and rain and all the rest of the winter type circumstances. But it’s Spring now to me and I’m having a blast with it. I hope you are too!

The Sap is Rising!

Steve

Building the Greenhouse

Some of these next posts will take us back in time a few years to when we first started some of the garden. I’m going to do a bit of an overview of how we built our greenhouse first. We started with a blank wall where the garage ends and we begin the work to level the ground to put in the greenhouse. We left the floor as dirt with gravel on it eventually, so it’s really grounded in the earth well.

To start the building itself is a picture of the framing of the foundation for the walls. After that we poured concrete mixed by hand in a big box made for it and put in the foundation. It’s got a wide foot on it and comes to a top of 4 inches wide to accommodate the frame. We poured it in a day, or was it night, I forget.. We worked at all  hours to get this one done. These first shots are from January 2010 when we started to build. Winter was not bad that year so we could work fine thru it.

Next we start to frame it and the walls are partly up here. We definitely overbuilt the thing since we managed to score a huge pile of wood at a local lumber store and got most of the wood for a mere $45 dollars. We got 2×8’s and 2×10’s and 2×4’s and trim wood and all sorts of stuff that they had in a special pile to sell cheap, So we took out generator and chop saw down to the store and cut the pieces to fit the van and hauled it all back home. It was a real deal and made the cost of the greenhouse much less expensive than it would have been.

We also scored on the windows. We found some big Millgaard last forever windows at a neighbors house where they were giving them away. They’re both double paned and are some 4′ wide by 3 1/2 high and make up the south west corner of the greenhouse. It’s was a real deal that saved us hundreds of dollars. It’s great when neighbors share their cast offs and they can be reused in our own place. Thanks, neighbors!

Next is a bit more framing with the door in it. Then one of the initial cladding of fiberboard to make the walls out of. Then the cladding with the door in it as well. We got a new storm door to put in since we don’t have a lot of light in the north side since the sides are walls instead of windows. So this big glass double paned door works great. It’s useful for letting in the light and keeping in the heat both.

Here are some interior shots as we put it together. In one I’m putting up some insulation which we put on all the walls. The garage was already insulated so we didn’t have to worry about that side. The whole place is insulated well with the thickest we could put in and it seems to work well. It’s sealed up really tight and when we first finished and shut it it was so tight we called it our Volkswagen Greenhouse. It would float! We had to open a window to get the door closed at first it was so tight!!

This is an interior shot of the greenhouse when we first did the seedbed and are getting ready to make it real. Next is the interior finished with the seedbed and the bench to put the finished plants on to grow. It looks like it has plenty of room here but we’ve filled up the space quite well over the years. At times it was bursting as I’ve shown in a past post. We made it as big as we could and fit the free windows in with an inch to spare. It’s tight as I said…

Here’s the seed bed all ready to go with the covers on it to hold in the moisture and keep the seeds moist and warm. There’s a coil of electric wire in the sand in the bed that heats up and provides bottom heat to the seedlings as they start to grow. It makes a big difference in starting seeds and in keeping the whole greenhouse a bit warmer when it’s on. But we only use it some of the year of course as heat. The rest of the time we just put plants there to use the space. Next are seeds in the seed bed growing. They look so cool and this was so exciting to see for the first time I’ll tell you!

This is my tool rack, or one of them. We have to use part of the greenhouse as a tool and storage shed – a potting shed if you will. It’s actually a combination of potting shed and greenhouse and I like the two combined. We both love to just hang out and sit in here on a rainy day and listen to the rain on the roof. It’s all done with fiberglass so the whole thing gets lots of light. So even tho some of it is walls there’s plenty of light to allow things to grow well in here as the years have shown us.

Finally here are a couple of shots of the outside of the greenhouse when it’s all done. First from the north side where the door is and the water barrel we use to gather the rain from the greenhouse roof and use it almost all year to water. We have to augment it in summer when it doesn’t rain (Yes, there are Months where it doesn’t rain here in Seattle, despite what you’ve heard… 😉 Next is the west side which gets the most sun along with the south side. The east is a garage so we don’t get much early daylight but it gets sun early enough to warm it up well each day when the sun shines

So that’s it. I made it in one post which surprises me. I guess it’s a lot to take in but it’s from start to finish, more or less, and I’ve given you an idea of what it takes to build a greenhouse. Or at least This greenhouse, anyway… The last pictures were taken in April of 2011 so we did all this in about 3 months or so. It was a lot of work but we’re so proud of it. It’s allowed us to grow so much good food and flowers it’s all been worth it. We get to grow all sorts of things we couldn’t grow outside, like the peppers we still have going after two years.

It’s a treat to have a greenhouse and if you have one I hope you’re enjoying it as much as we are. It’s a great thing to have to enhance your gardening, even if it’s a little one like ours. BTW this whole place is only about 6 x 14 feet overall with a ceiling of 7ft or so. It’s compact and just right… I wouldn’t want anything bigger or I’d go crazy trying to fill it. It’s big enough that we’re happy with it and will be for years to come.

Happy Greenhousing!

Steve

Growing a Greenhouse

IMG_3557 IMG_3559 IMG_3560 IMG_3562 IMG_3561 IMG_3558


I posted awhile ago about my greenhouse, when it was still in the throes of clean up and I was far from this day of amazement when I have things growing all over the place. I seem to have good luck in starting certain things from seed and then transplanting them to small pots and finally to the garden. This year I focused on tomatoes and some greens and of course some corn. Here’s some pictures of the greenhouse in full production mode.

The first shot is one of the whole greenhouse from the doorway. It shows the starting bed on the left where I have heating cables in the soil to allow for greater germination of the seeds. I cover it all with a plastic cover to keep it moist and it works great to start all sorts of things.

There are a lot of corn plants in the starting bed and on the right are the ones that are growing to to become plants for the garden. You can see a lot of tomatoes and some other seedlings, like zinnias, one of my grandmother’s favorites which I wanted to plant a lot of this year just for nostalgia’s sake, and because I also love them. The second shot shows the zinnias by themselves.

Next is a permanent part of the greenhouse under the starting bench. I wanted to have some tender plants growing year round so I planted a Tradescantia Purple leaf form that sprawls all over the floor and I have to keep it trimmed back some. There’s also a nice Persian Cyclamen that blooms quite nicely in winter and later into spring, tho it’s done now. It makes for a lovely scene under the bench for some year round color and foliage. There’s also a native fern growing wild in the tradescantia that I’ll have to remove someday as it’ll get too big but it’s so pretty now I’ll leave it.

In the next one you can just barely see the little peppers on the plants I held over thru the winter in the greenhouse and pruned back to allow for new growth.  To my surprise and joy they came back strongly and have been blooming well and already have set some fruit. How welcome to see because the peppers from this year are just still sitting there. So it’s lucky I have the ones from last year to have some fresh hot peppers for my cooking as they grow and develop.

There’s also a shot itself of the corn which we started in flats and then transplant out to the garden. We also give a lot of them away to neighbors. We do the same with tomatoes and this year I went kinda hog wild and planted far more than I can use and I suspect I’ll have a hard time giving them away. If you’re in the Seattle area give me a holler and I’ll share with you. I’ll have to get creative to see what to do with all of these local plants that are doing so well.

I bought some heirloom tomatoes from the Seed Savers’s Exchange this year – a Ukranian Purple, a Beams Yellow Pear, and an Emmy that is a golden orange that they sent as a bonus to me, like I needed more seeds! I also planted a local variety called Siberia because it’s a short season grower and we don’t have a long hot summer here in the Northwest. So I’m hoping it will put on some good fruit. Last year I did all heirlooms and they dd so well I thought I’d try them again. I plan to plant at least 4 types of tomatoes and see how they all do. We’ve already started planting the veggie garden with some greens I started earlier and some onion sets and some lettuce starts we got at the nursery. It’s looking good.

So I’m keeping this a short post. I just wanted to share what it’s like to have a greenhouse and how wonderful it is to be able to start your own plants. Some I have better luck with than others but it’s OK. I’ll have plenty of plants to put out into the garden and tho it may not be totally cost effective to do all this it sure does pay off in the good it does for my soul to garden and take care of these baby plants till they can become the giants some of them become. I can’t wait to see the results. If you have a greenhouse or just a cold frame I hope you’re having good luck yourself in growing things so you can plant them soon. We intend to put things out this weekend so they’ll have a good chance of growing into good size plants soon.

Happy gardening to you all and good luck with your starts.

Steve

Seeds, Seeds, Seeds

Seed Catalogues

Well I’m finally getting around to it. I’ve had some seed catalogues for awhile now and I’ve been procrastinating about ordering seeds from them, but I think it’s time I get to work and do it. I’ve decided to mostly try to go for heirlooms this year since I had such good luck with some last time around so I’m focusing mostly on one catalogue – the Seed Savers Exchange.

The Seed Saver’s Exchange is a unique and remarkable entity. They encourage the saving of open pollinated heirloom seeds from all over the world in an effort to maintain the genetic diversity of our plant life. You may know this but if you don’t you should. Our genetic pool is dwindling precariously as more scientists plan more genetically modified and patented seeds. Now a farmer often can’t save their own seeds and has to buy new ones every year from the seed supplier because of patents and protections. It’s a dumb thing to do. And terrible for 3rd World farmers who should be saving their seed for money’s sake but instead are forced to buy from their suppliers. It’s a scam of monstrous proportions.

We only have a few varieties of many of the major plants we rely on for food. One is corn. We generally use only a couple of varieties of corn for all those thousands of acres of it plants all over the country. It would be a calamity if some scourge attacked the crops and we had nothing to fall back on. That’s where Seed Savers comes in. They have genetic stock of all sorts of old style varieties that still bear really well and are open pollinated and non patented so you can grow your food and save your own seeds, thus making the plants stronger and more adapted to your climate every year.

I haven’t gotten into that much yet tho I’ve been saving some seed for years. But mostly flowers. Now I’m going to try saving my veggie seed as well. I’ve been going thru the Seed Savers catalogue and have found a plethora of wonderful plants that sound just so yummy to eat that I’m barely into the booklet and already I have more than I’ll probably plant. But I want to try some things in the greenhouse again this yer so I have to order some things soon so I have a chance for growing them before I get to the real work of the outer garden.

I want to plant some old fashion zinnias this year. They were my grandmothers favorites and I try to grow them every year but haven’t for a year or two. So this year I’m getting some special red ones that have been around since the 1800’s sometime. They’ll make a great border for the fr0nt of the yard where the street is. I have Oregon grape and nandina as a back drop next to the Thuja pyrimidalis  and it will look so pretty with the red zinnias all across it.

I’ve found several other flowers that I want to plant too. But mostly now I’m focusing on veggies. I’ve got an Early Bird Turnip Beet that grows a huge red beet that will have lovely greens to munch on in the interim while I wait for the beets to grow. They talk in the catalogue about baking beets and carrots for the best flavors. I haven’t tried this yet but I intend to. I do it with yams all the time and they turn out so well. I’m sure the beets will do just as well.

I’ve also picked out a couple of varieties of carrots – a Nantes variety for keeping since they do it so well and an Oxheart for the same but I also picked out one called Dragon for it’s red skin that just looks so delicious I had to try it. I love root crops tho they aren’t always easy to grow for me. I’m still somewhat of a novice to veggie gardens as I haven’t had a place for it for too long but I do remember some things. And carrots do well for us so it makes sense to want a lot of them. They keep well.

As far as keeping goes, the best plants for us have been our yellow onions we buy from a local nursery in bags ready to plant. We’ve grown them for 3 years running now and the bulbs stay firm and lush all thru the winter and into spring. We have a whole bx of them in the garage just waiting for us to come to pick them to eat. They’re quite yummy and have a sharp flavor that goes well with strir frys and Mexican dishes. I love onions. They say they increase your sex drive but I dunno if that’s really true. Sounds good tho eh? 😉

I love eggplant and have had good luck with the Japanese variety in the greenhouse a year ago so I’m going to try some again. It’s a different variety and has a longer fruit so I hope they make it in time. I figure I’ll start the seeds of them now since they’ll always be in a sheltered place and that way I can increase the growing season. I’ve done tomatoes and peppers in the greenhouse the last two years and had mixed results. The first year I got a tomato specifically for greenhouses and they did quite well.

The peppers did wonderfully. I plan to grow more of them this year but haven’t decided on which varieties I should try yet. I ate the ones I liked and didn’t save seeds, darn it, so will have to start new, but there are so many types to try. I’ll do OK I’m sure. I love the possibilities with all the peppers. And of course I like the hot ones the best. Ah well.

I couldn’t get by without greens and I intend to grow my usual Bok Choy, using one of the Seed Saver special varieties. I also want to try some Tatsoi which is an Asian green that looks to be quite tasty and has a rosette of rounded leaves and will form a nice head. I tend to just pick the bok choy as I need it and let the plants keep on growing rather than try for heads like the markets do. Maybe I’ll see if I can get some to head up this year, just for a change.

And of course I have some Red Russian Kale which looks to be beautiful and will last thru the winter and only get sweeter as it tends to do when it chills. Kale is so full of good stuff and it lasts so well in the garden it’s always nice to have fresh greens in the depths of winter and we enjoy it immensely. This variety it so lovely with its red veins and light green leaves, so different from regular kale with its darkness and full bodied leaves. These look like they’d be delicious.

I have so much more work to do still. I have to finish going thru the catalogue and finding out everything I’d Like to grow and then I have to get real and narrow it down to what’s likely for me to be Able to grow and come to a happy compromise. I’ll stil buy too many seeds I’m sure. I always do but then they do last for some time usually and I do keep them. In fact I still have some good seeds left but I may just do the heirlooms this year and see how they do.

It’s exciting to feel yourself a part of a movement to reclaim our horticultural heritage. I’m a member of the Seed Savers Exchange and get a discount on my purchases but if not I’d buy from them without the discount. I think they do such good work. Such essential work. I hope some of you decide to try to find them. You can Google them I suspect but I’ll give an address just in case. They’re at: Seed Saver’s Exchange, 3094 N. Winn Road, Decorah, IA, 52101. Look them up and check them out. You may find a whole new world of seeds to try!

Happy seed shopping,

Steve

Preparing the Greenhouse

Interior of Greenhouse

As you can see by this shot I haven’t been paying much attention to my greenhouse lately. I’ve been too busy with other things and frankly it hasn’t been time. But it’s getting to be that way soon. As you can tell it’s time to do some clean up. The tomatoes that bore such nice fruit in the summer have faded almost entirely away and the hot peppers that produced such luscious spicy additions to our meals are starting to wane and they need eating soon or drying anyway. It’s time to spread the soil from the pots on the garden and clean up the benches. I need to wipe them down with a dilute bleach solution to make sure of killing any spores or diseases that might have come in during the growing season. Last year I had mold and I don’t want that again.

It’s time for me to start looking more seriously thru the endless piles of gardening and seed catalogues I get and order some things to grow next year. I know it’s too early to actually plant them but it’s going to be time soon enough. I’m still pretty new at this greenhouse business, having only had this one for less than 3 years and I’m still learning when to do what. I have my books to be sure and I do read up on when to plant things but I don’t have the innate knowledge of it that I do of the rest of my garden as a whole. I have so much to learn it overwhelms me. I want to do it right of course but this is one area where I have to be patient and to allow myself to make mistakes. At times it seems hopeless. But I love it.

I’m so happy to have this wonderful place to play and work in. Right now it’s not raining, for a change, but when it does I revel in just going out in the greenhouse and standing there and listening to the rain on the roof and hearing it rushing into the rain barrel outside. The barrel keeps the Greenhouse watered from the rains fine for most of the year until late summer when I have to fill it with the hose. I don’t have plumbing in this structure. So I use watering cans and they work swell. I haven’t had to water much lately because it’s so moist in there. In fact there’s a de-humidifier running now that helps keep the moisture down. It’s time to have the heat on too so that the tea plants and the other things that are still growing there have warmth on some of these nights when the fountains freeze over outside and there’s frost on the pumpkins when I get up in the mornings.

It’s time to get the starting bed ready too. To get it ready to turn on the wire heater that heats up the sand I have there that I set my seed flats on. Then I roll down the plastic covering and I have a mini seed starting bed right inside of the greenhouse. It’ll be time soon to do that. I don’t want to be too early but I don’t want to wait too late either. I believe in being prepared and it’s never too early to clean things up and make sure that all systems are functioning well and in good working order. That’s my task for now . Preparing things for later on when it’s time to plant. Because once things get going there’s not a lot of space for these sorts of things and you have to do them now when it’s empty. It gets full in here later on when things are in full growth.

I so enjoy the growing season. I’ve gotten really good at transplanting seedlings from the flats to larger containers and I love working with the tiny things and seeing them grow as they put out new roots into the soil. It’s so exciting and I’m thrilled to think that this cycle will all be beginning again soon. But not yet. First comes the cleanup and then rearranging things and getting ready for planting. So I have awhile. But it’s time to get serious about it all and I will soon. It just takes getting started and once I get into it I’ll have the whole place ship shape in no time and it’ll be ready for those little seeds to be placed gently in their flats and start the whole process over again. I love gardening and having a greenhouse extends what I can do so much. I feel so lucky to have this beautiful place that functions so well for me. It gave a lot of joy to many people the last couple of years. I think it’ll do the same this year. After I get it Prepared.

Happy greenhouse gardening,

Steve